News
Interpreting Stability Tests
ECTP29? PST 45/100 end? CT13? What does it all mean?
For some time now we’ve been wanting to create a ‘cheat sheet’ for those unfamiliar, or may want a little reminder, of what the jumble of letters and numbers mean in a lot of the snowpack observations we share. These are codes for snowpit test results and are professional tools that have been developed and standardized by the American Avalanche Association and the US Forest Service Avalanche Centers, along with our Canadian friends. While test codes may be second nature to some folks, to others it may seem like a foreign language. Hopefully this cheat sheet can clear up some of that confusion.
One piece of the puzzle
Before digging into the test result codes, it is important to describe how we use the results from stability tests. Stability tests can be tricky. One stable test result doesn’t carry a whole lot of weight on its own, but days or weeks of snowpits with stable tests will usually indicate a stable snowpack. Conversely, a handful of poor test results on the same layer will suggest that the snowpack is capable of producing an avalanche. Generally, we consider each snowpit as just one small data point in a much bigger picture to estimate the likelihood of a person triggering an avalanche. This big picture includes all of the other test results in recent days and weeks, along with the other critical observations like recent avalanche activity, red flags, and changing weather.

Graham Predeger in the snowpit high above the Placer Valley.
Stability tests at a decision point
Stability tests may also be used as a final step in deciding whether it may be a good idea to move into avalanche terrain. In this sense, we are essentially saying all other signs are pointing to a stable snowpack, and we want to do one last test to support our assessment. We’ll use an unstable test result as an indication to step back from steep terrain, but we wouldn’t use a stable test as the only factor to get into steep terrain. That choice needs to include all of the other data available (recent trends, recent avalanches, red flags, weather, etc.).
There’s the background. Interpreting tests can be confusing for seasoned backcountry travelers and novices alike. It takes a lot of time to gain a sense of what a stable test means versus what an unstable test means; and then there still can be a level of uncertainly. If you are trying to apply stability tests to your personal backcountry toolkit, the only way to use them effectively is through a lot of practice and seeing how your results align with how the snow is behaving. Hopefully this post will enable anybody to better understand the observations on our website, and improve the overall understanding of the current avalanche conditions.
Extended Column Test
This test involves isolating a column of snow and loading it by resting a shovel on top of the column on one end and tapping the back of the shovel. We are trying to see whether we can initiate a fracture, and if that fracture will propagate across the column. The most important piece of the Extended Column Test is whether it propagates or not. A propagating test means a fracture shot all the way across a column, and indicates the snowpack is capable of producing an avalanche. A non-propagating test means a fracture was initiated but stopped before it crossed the column. Check out this older video that explains how to perform an ECT test.
*This test is only used to assess weak layers in the upper 3′ of the snowpack. It is not effective in assessing deeper layers.


Compression Test
This test involves isolating a narrow column and loading it by resting a shovel on top of the column and tapping the back of the shovel. We are trying to see how many taps it takes to initiate a failure in any layer in the snowpack. Lower test numbers indicate weaker layers, higher test numbers indicate stronger layers. Since this is a narrower column, it is most useful for identifying weak layers, but very difficult to infer much about whether an avalanche would happen on a slope with a similar snowpack because we have no idea whether a fracture will propagate after it is initiated.
*This test is also only used to assess layers in the upper 3′ of the snowpack.
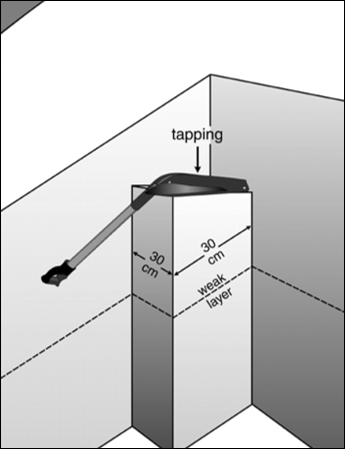 Schematic of a Compression Test by Bruce Tremper.
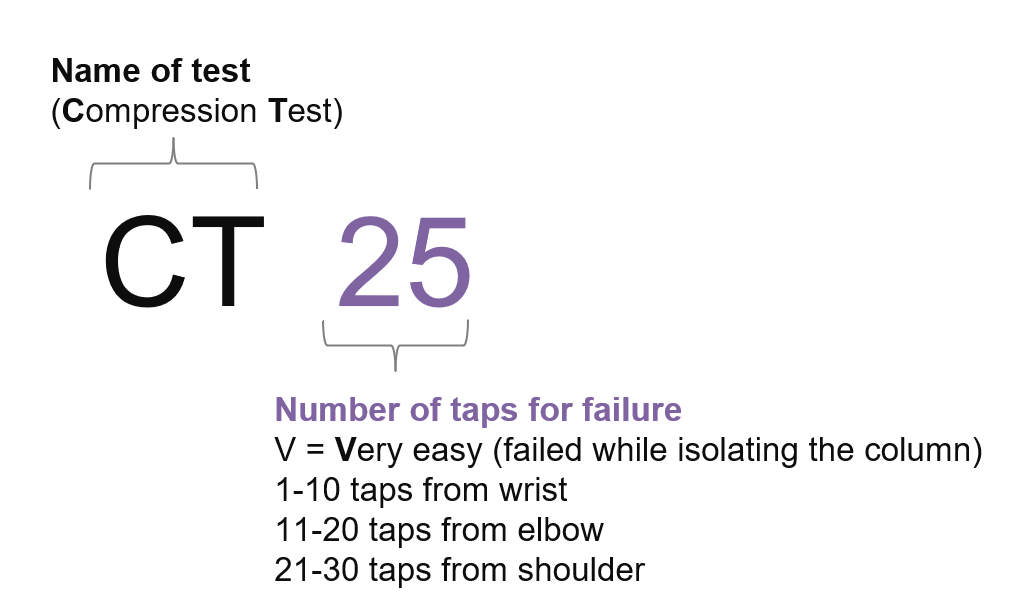
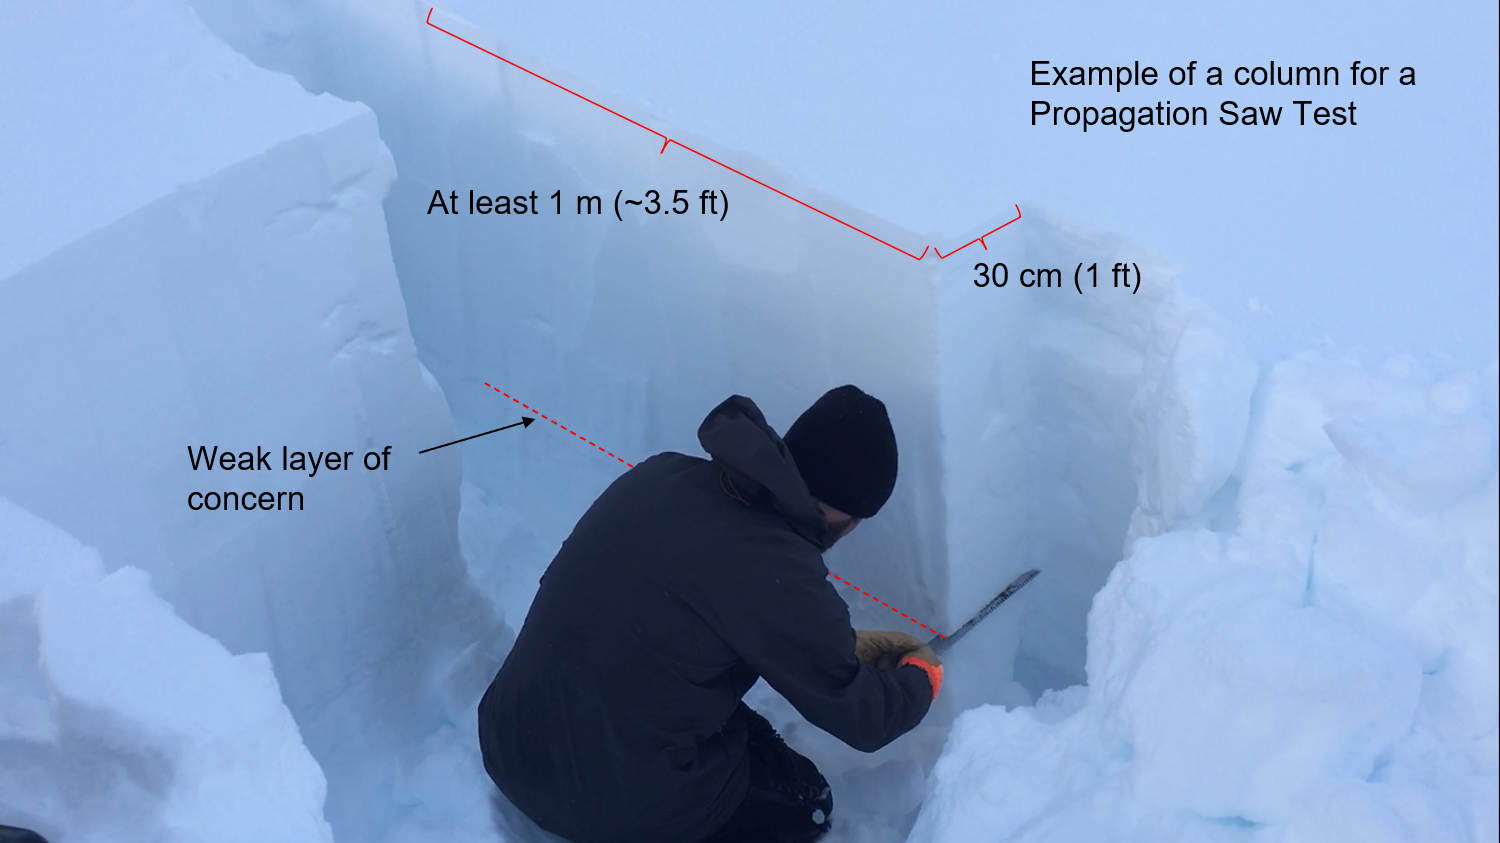
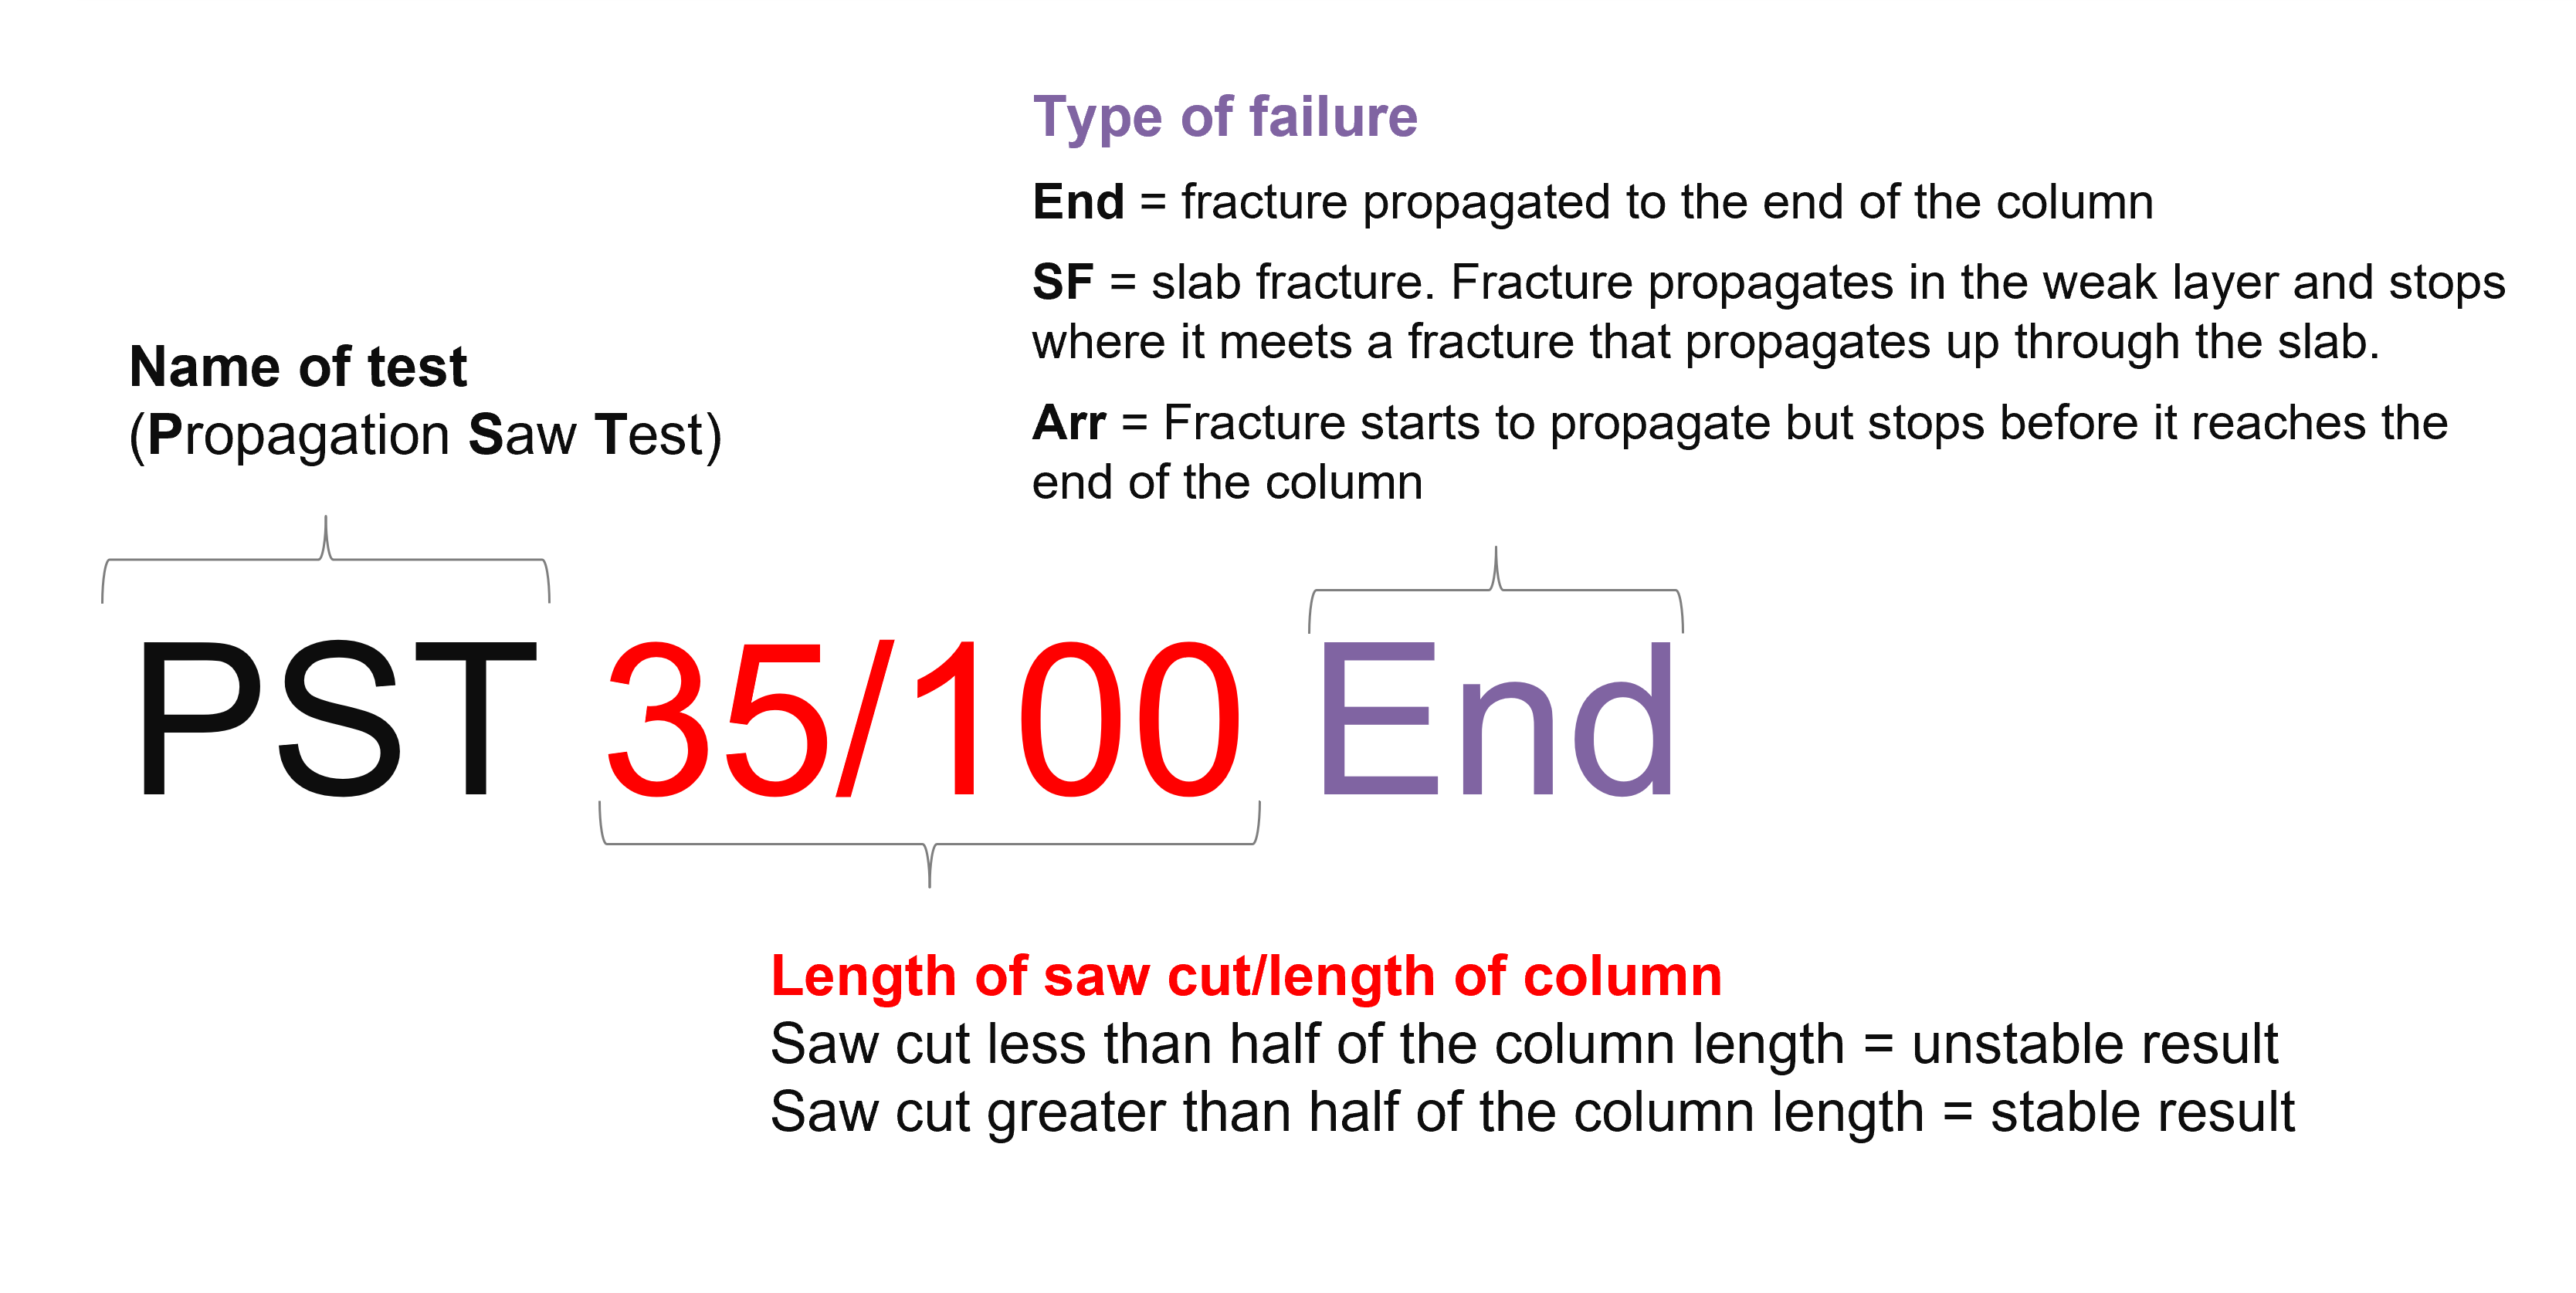
Propagation Saw Test
This test is relatively new and there is still much discussion how to interpret it. It involves isolating a long column of snow, selecting a weak layer, and sliding a snow saw backward through the weak layer until a fracture is initiated. There are two main pieces to look for in a PST: (1) how long was the cut length (how far did the saw have remove the weak layer before it collapsed)? and (2) how did the fracture move through the column? Shorter cut lengths with the fracture propagating to the end of the column are the most unstable results, while longer cut lengths with ‘slab fractures’ or ‘arrests’ indicate better stability. This test is typically used to assess layers buried deeper than 3′ in the snowpack, since those are too deep for the ECT or CT.